Getting Started: LiteSpeed
Here at GeekStorage, we love LiteSpeed! There are many good reasons for this, not the least of which is LiteSpeed's fantastic PHP performance. Not only is LiteSpeed an amazing web server, it is also very easily configured via an online GUI, making the setup process very user friendly. This article will demonstrate how to get started with a basic LLMP setup on your VPS or Dedicated server.

What you will need:
- A Linux-based VPS or Dedicated Server. We recommend our blazing fast SSD VPS service. Combined with LiteSpeed, it's on a whole new level of speed.
- Familiarity with the Linux console. Check out our SSH tutorial if you are new to Linux or the console.
- A need for speed!
- (Optional) We recommend using CentOS 5.x or 6.x to follow along with this guide
We will be using the LiteSpeed Standard Edition for this setup. It is completely free and supports up to 5 domains and 150 concurrent connections. While lacking some of the more powerful features of the Enterprise Edition, it is a great platform for a development environment due to its ease of setup and speed.
Installation of LiteSpeed
Let's not waste any time! Login to root shell on your server and download the LiteSpeed Standard Edition. The download link can be found here: http://www.litespeedtech.com/litespeed-web-server-downloads.html
In our case, the current version is 4.2, so we downloaded it for our install:
cd /usr/local/src
wget http://www.litespeedtech.com/packages/4.0/lsws-4.2-std-i386-linux.tar.gz
tar zxvf lsws*.tar.gz && cd lsws*
./install.sh
You will see the installation process begin, which loads up an EULA. Once the EULA is accepted, you will be presented with a few options. Enter an appropriate password for the administration interface, and in our case we configured the web server with the following settings:
- Destination directory: /usr/local/lsws
- Administration user name: admin
- Administrator email address: root@localhost (if this is not forwarded you may want to enter your actual email address for updates & alerts)
- Web server user: nobody
- Web server group: nobody
- HTTP port: 80
- Admin HTTP port: 7080
- Setup PHP: Yes
- PHP suffix: php
- AwStats module: No
- Start LiteSpeed with the server: Yes
- Start LiteSpeed now: Yes
Quick MySQL Installation
At this point, your new web server is up and running. But, there are still a lot of things to do! Let's take a moment to get MySQL installed:
yum groupinstall "MySQL Database"
service mysqld start
/usr/bin/mysql_secure_installation
We recommend accepting the default settings, and using a strong root password during the MySQL secure installation. MySQL is now up and running with a default configuration.
Customized PHP Installation Has Never Been This Easy
Now let's dive in to the LiteSpeed administration panel. Navigate to http://your.vps.ip.address:7080/ in your browser. You can also use your hostname or any domain attached to your server to accept LiteSpeed on port 7080 via your web browser. Use your previously configured administrator username & password to login.
Navigate to the "Compile PHP" page.
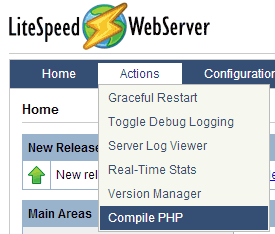
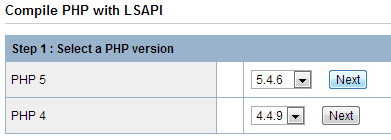
On this page you can select your PHP version. Since we're setting up our development environment, let's go with the latest selection available: PHP 5.4.6.
On the next page you will be presented with a number of options for customizing your PHP installation. In addition to the defaults, we selected to enable APC and PDO MySQL like so:
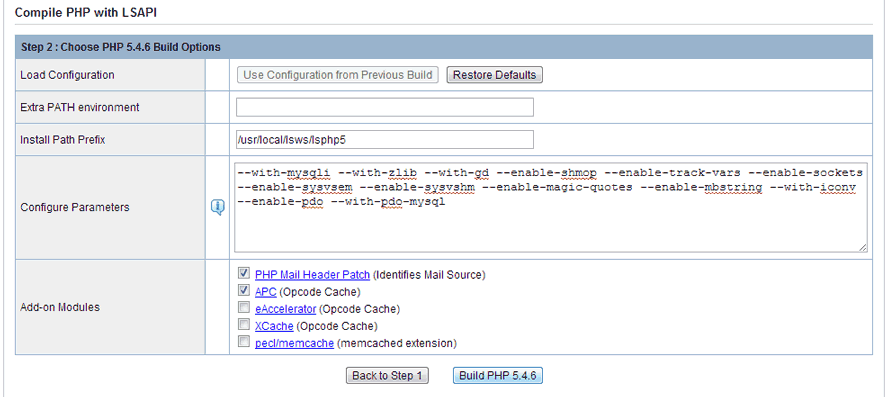
After clicking "Build PHP" you will be presented with a status page, outlining what is taking place to prepare for the installation. In our case, this covered the download of all the source files, as well as the installation of the base APC package. The actual PHP installation takes place after clicking "Next" where you will be presented with a command to run via root shell. In our case, the command looks like this:
/usr/local/lsws/phpbuild/buildphp_manual_run.sh
After running this command at root shell, you will begin to see updates in your browser to the LiteSpeed administration page. In our case, we seem to be missing some key components to build PHP. Since this is a fresh, barebones CentOS 5.8 installation, we are missing the development packages. This is quickly fixed by installation the development packages and re-issuing the PHP build command as provided by LiteSpeed:
yum groupinstall "Development Tools"
/usr/local/lsws/phpbuild/buildphp_manual_run.sh
After a few seconds the LiteSpeed page will recognize that you have started again, and begin updating the output panel. As we usually find when installing PHP on a fresh system, we need something that is not yet installed. We were able to resolve all remaining dependencies in this case by issuing the following commands:
yum install libxml2-devel libpng-devel
/usr/local/lsws/phpbuild/buildphp_manual_run.sh
The PHP build completes successfully now within 3-10 minutes, depending on your options and system capabilities. After the build completes, click "Apply Changes" to get to the next page where you can restart LiteSpeed to finalize the changes.
After the build is complete, there's one last step to ensure PHP is fully functional: We need to setup a php.ini file. This is something LiteSpeed does not setup for us automatically, and the PHP binary is initially setup without any php.ini file in place. The generated PHP binary looks for php.ini at /usr/local/lsws/lsphp5/lib/ - Luckily, there is a default php.ini included with the distribution that LiteSpeed downloaded:
cp /usr/local/lsws/phpbuild/php-5.4.6/php.ini-development /usr/local/lsws/lsphp5/lib/php.ini
vi /usr/local/lsws/lsphp5/lib/php.ini
We do need to make some changes to the file, so we have fired up VIM to get our editing underway:
- Uncomment and set extension_dir to the appropriate location, in our case this was the required setting: /usr/local/lsws/lsphp5/lib/php/extensions/no-debug-non-zts-20100525
- Add this line below the extension_dir line to include our compiled APC module:
extension=apc.so
So we fire up PHP and see what happens:
/usr/local/lsws/fcgi-bin/lsphp5 -v
In our case, we encountered the bug described here: https://bugs.php.net/bug.php?id=61238
To fix this we ran the following:
svn checkout http://svn.php.net:/repository/pecl/apc/trunk apc
cd apc
/usr/local/lsws/lsphp5/bin/phpize
./configure --enable-apc-pthreadrwlocks --with-php-config=/usr/local/lsws/lsphp5/bin/php-config
make
make install
Now we are seeing a clean output from PHP:
[root@litespeed apc]# /usr/local/lsws/fcgi-bin/lsphp5 -v
PHP 5.4.6 (litespeed) (built: Oct 31 2012 12:40:07)
Copyright (c) 1997-2004 The PHP Group
Zend Engine v2.4.0, Copyright (c) 1998-2012 Zend Technologies
LiteSpeed Site Setup
We like to use the /home/username/public_html setup for our websites, but we find a setup such as /home/username/domain.com/public_html works out better when working with LiteSpeed directly, so that we can take advantage of the pre-made PHP_SuExec template. First we're going to get our user account ready:
useradd lstest
chmod 711 /home/lstest
cd /home/lstest/
mkdir litespeedtest.com
mkdir litespeedtest.com/public_html
chown -R lstest:lstest litespeedtest.com
chgrp nobody litespeedtest.com/public_html
Now, in LiteSpeed, navigate to the Virtual Host Templates section.
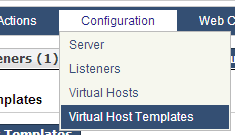
We will be using the PHP_SuExec template so we can get up and running quickly and securely. Click View/Edit next to the template.

On this page, click "Add" next to Member Virtual Hosts. This will allow us to setup our domain & directory to be associated with this template.

For our needs, we have used the following configuration:

Now all that is left is to restart LiteSpeed, upload our files to /home/lstest/litespeedtest.com/public_html/, and make sure our domain is pointed to our server using the GeekStorage MyDNS service, or a third-party service, if desired.
We are already up and running with a working PHP and MySQL build, with a secure SuExec configuration for added protection against hackers, and APC support:
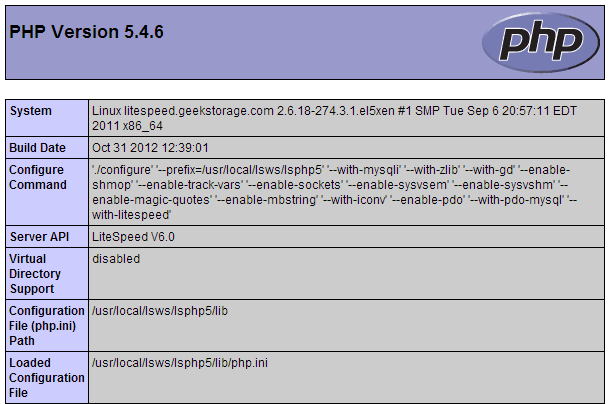
Setup Complete
What do you plan to build with your new LiteSpeed-powered website? We love using LiteSpeed for our development platform, and the setup couldn't be more straightforward. With .htaccess and mod_rewrite support included, you can use all PHP ORMs without fear of losing functionality. The integrated PHP SuExec template also eases the development environment so you can focus on your code and not on filesystem permissions. From this point, it is a breeze to support a development platform. You now have LLMP, just add code!